Want a manicure that feels both elegant and fun? Marble nails are one of the most striking nail art trends of recent years, creating a swirl effect that looks like natural stone.
The marble nail trend works on natural nails, gel polish, acrylics or even a simple DIY with regular polish. From soft pastels to bold black with gold details, it’s a versatile look that you can adapt to any season, style or event.
In this step by step guide, you’ll learn how to prep your nails, the easy way to create the marble effect, colour combinations that always stand out, and pro tips to keep your manicure looking flawless.
What are marble nails?
Marble nails are a type of nail art where two or more colours are blended together to create a marble effect. The result is a unique swirl pattern, sometimes soft and smoky, other times bold and defined, that instantly elevates your manicure.
The beauty of this style is how adaptable it is. You can achieve marble nails on:
- Natural nails with regular polish.
- Gel polish or acrylics for longer-lasting results.
- Semi-permanent manicures for customers who want salon-quality finishes.
Because each swirl is unique, no two fingers ever look exactly the same. That unpredictability is part of what makes the marble nail trend so popular on Instagram and in salons around the world.
Prepping your nails
Before you start painting, proper prep is essential. Skipping this step can lead to excess polish flooding the cuticles or a design that chips too soon:
- File your nails into the shape you want (almond, oval, square, ballerina).
- Push back and clean the cuticles carefully.
- Apply a thin layer of base coat to protect the nail surface from stains and to help the colour grip better.
Pro tip: always wait for your base coat to dry completely (or cure if using gel polish) before moving to the next step.
Tools and materials you’ll need
Creating marble nails doesn’t require much, but having the right tools makes the process smoother. You’ll need:
- Nail polish in at least two colours (white + black is a classic, but you can mix any hues).
- A toothpick, fine brush or dotting tool to create swirls.
- A cup of room temperature water if you want to try the water marble tutorial method.
- A cotton swab (dipped in remover) to clean polish from the skin.
- A topcoat to seal the design and protect it from chips.
How to create marble nails: step by step
There are several ways to achieve the marble effect, but here’s an easy process you can try at home or in the salon.
- Apply your base colour: start with two thin coats of a light shade (white or nude works best). Let them dry completely.
- Add drops of colour: using a brush or toothpick, place small drops of a contrasting polish onto the nail.
- Blend gently: drag the colours with a fine brush or swirl them lightly with a toothpick to create natural-looking veins. Avoid overworking, or the colours will blend into one flat shade.
- Refine the details: add a thin layer of metallic polish, such as gold, for extra dimension. This gives the marble an elegant, striking effect.
- Seal with topcoat: apply one or two thin coats of topcoat to protect the design. Cure under a lamp if you’re using gel polish.
If you’re trying the water marble technique, dip your finger into room temperature water where drops of polish have been placed. Swirl the colours with a toothpick, then dip the nail to print the design directly. Clean around the skin with a cotton swab, and voilà, your marble is ready!
The best colours for the marble effect
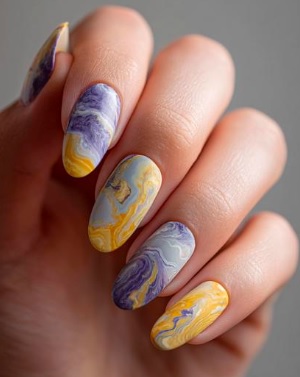
While black and white remain the most popular combo, marble nails are all about creativity. Here are a few ideas:
- White + grey + silver for a cold, stone-like look.
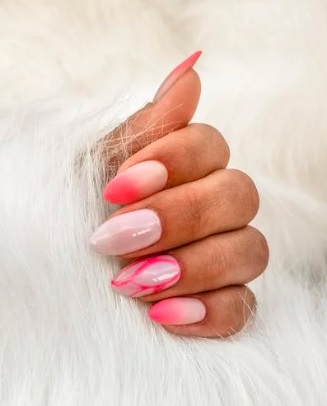
- Pink + gold for a feminine, Instagram-ready style.
- Blue + navy + black for depth and dimension.
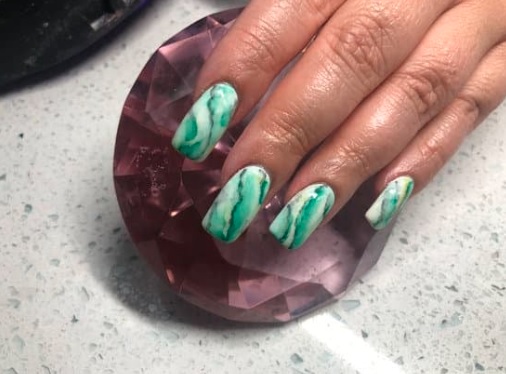
- Green + white for a fresh spring manicure.
- Burgundy + gold for autumn and winter elegance.
The point is to play with contrast: light vs dark, matte vs glossy finish, neutral vs bold. That’s what makes the marble nail trend so versatile.

Which nail shapes work best?
Marble nails can be adapted to almost any nail shape, but some show off the design better:
- Almond or oval nails give plenty of space to create flowing swirls.
- Square or squoval nails make the marble lines look structured and modern.
- Ballerina (coffin) nails give a long surface for dramatic art.
If you’re wearing stiletto nails, consider using the marble effect as an accent on one or two fingers…it prevents the look from becoming too heavy.
Matte vs glossy marble nails: which look stands out more?
Both matte and glossy finishes can make marble nails look stunning, but they create very different vibes:
- Matte marble nails give a velvety, flat surface that feels modern and edgy. The swirls look softer and more blended, perfect if you want a cool, fashion-forward manicure that photographs beautifully.
- Glossy marble nails reflect the light and make colours pop with extra shine. This finish works well if you want a striking, high-contrast look that feels polished and elegant.
Think of matte as velvet and glossy as silk, both luxurious, but each with its own personality. Choosing one depends on the mood you want to create and the occasion you’re preparing for.
Tips for perfect results
Even if the process is easy, a few tricks will help you achieve a professional look:
- Always apply thin coats of polish…two thin coats last longer than one thick coat.
- Don’t rush drying time. Wait until each layer is completely dry before continuing.
- Protect your fingers with liquid latex or tape when using the water marble method, so excess polish doesn’t stick to the skin.
- If your marble looks too harsh, blend with a clear coat before sealing.
- Customers love small details…try pairing marble nails with a glossy finish accent or gold foil for a luxury touch.
Troubleshooting common problems
- Colours blend into one shade → Use fewer drops and avoid over-swirl with the toothpick.
- Design chips quickly → Apply a thin layer of topcoat every few days to refresh the seal.
- Polish floods the cuticles → Use less product and clean immediately with a cotton swab.
- Marble looks flat → Add metallic accents or a second layer of detail lines for more depth.
FAQ
Do marble nails work on natural nails?
Yes! You can create the marble effect directly on natural nails using regular polish. Just make sure to apply a base coat first to protect the surface and prevent stains.
Can I do marble nails with gel polish?
Absolutely. Gel polish is one of the best ways to achieve marble nails because you can cure each thin layer under the lamp, giving you more control over the swirl effect and longer-lasting results.
What colours look best for marble nails?
Classic black and white never fail, but marble nails look stunning in all sorts of combinations: pink and gold, blue and navy, green and white, or even burgundy with a glossy finish. The key is contrast…light against dark or matte against shiny.
How do I stop excess polish from flooding the cuticles?
Always apply thin coats and keep a steady hand. If some polish touches the skin, clean it immediately with a cotton swab dipped in remover before it dries.
What’s the easiest way to create the marble effect?
The simplest process is to apply two thin coats of base colour, add drops of a second polish, and swirl gently with a toothpick. For a striking design, you can also try the water marble tutorial by dipping your finger into room temperature water with drops of polish.
Do marble nails last long?
With regular polish and topcoat, marble nails usually last about a week. With gel polish or acrylic, they can last up to three weeks, especially if you seal the design with a topcoat and protect your nails from oil, water and chips.
Can I add gold or glitter to marble nails?
Yes! Gold foil, glitter or metallic polish are popular ways to elevate the marble effect. They create a luxury finish that really stands out and looks amazing in photos or on Instagram.
Final thoughts
Marble nails are proof that nail art can be both elegant and fun. Whether you choose a glossy finish for classic shine or seal your design with a matte topcoat for a modern twist, this style stands out in any setting.
With a little prep, patience and the right process, you can achieve marble nails that look salon-perfect even from home. And once you’ve mastered the technique, the possibilities are endless: bold colours, delicate prints, glitter touches, or striking metallics.
If you want to continue building your skills, explore our online courses at BeautyLearn. From polish basics to advanced nail art tutorials, we’ll help you create looks that customers will love.