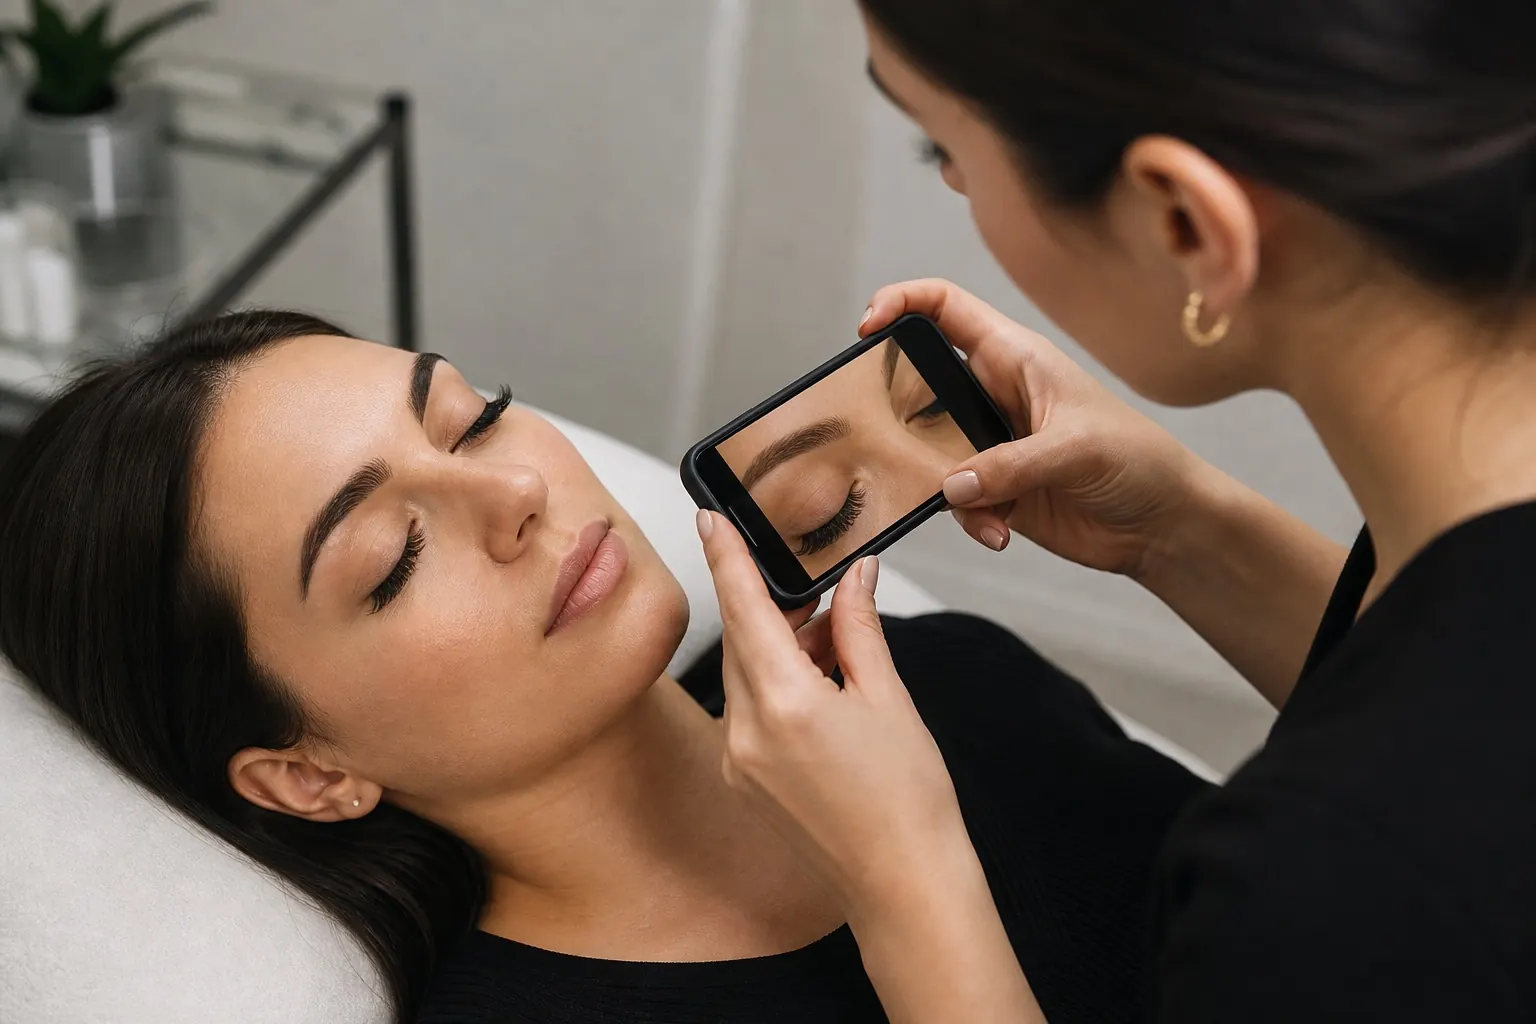
To photograph lash extensions and lash lifts with a smartphone, prepare diffused light, keep the phone steady and focus on the lashes. Inspect the captured file at higher magnification and repeat the same views: a useful photograph should show your work clearly without altering fibres, curl or colour.
Here you will find five visual examples, the controls to look for on iPhone 15 and a reusable record sheet. The lash mapping and the lash lift protocol come first: photography documents a result that has already been completed and checked.
Last substantive update: 23 September 2026. The five illustrations are teaching examples of checks to repeat in your own setup.
Quick protocol for photographing lashes
Do not use an attractive photograph as your only technical evidence. Shallow depth of field, a side pose, shadows and reflections can flatter the result while hiding the other eye, lash tips or direction. Always keep a neutral, comparable series before creating editorial images. Photography should add information, not replace an in-person check.
Prepare the purpose, client and setup
A client-record photograph, self-assessment image, training exercise and image for a website or advertisement have different requirements. Private documentation prioritises consistency, date and case identification; a portfolio adds selection and visual quality; paid promotion also needs permission appropriate to that purpose. Write the intended use in your shot list before shooting to avoid collecting unnecessary or overly intrusive images.
Technical self-assessment needs views showing both eyes, attachments and directions within the limits of photography. Communicating a style also calls for a wider portrait and a view of the effect on the face. A before-and-after record needs two series with matching variables. Do not try to fulfil all three purposes with one extreme close-up.
In the lash extension and lash lift client record, record the service identifier, date, technique, relevant products and links to the original photographs. Avoid full names in public files; use an internal code governed by the business’s access and retention rules.
Prepare the client and completed result safely
Photograph only once the treatment is finished, products have been removed as the system requires, the area has been checked and the client can open or close their eyes comfortably. Do not ask them to hold an uncomfortable position or bring tools or products back near the eye just to make the scene more interesting. If burning, significant tearing, pain or difficulty opening the eyes occurs, photography is not the priority: stop and follow the appropriate professional protocol.
Clear the background and remove pads, tape, visible residue and used materials. Show lashes in the condition the client will actually see: a manufacturer-specified finishing treatment may remain, but water, oil or gloss added only for the photo changes separation and reflections. For extensions, check for stickies and attachment distance first; the guide to extensions and natural lashes explains why an external photograph alone cannot demonstrate safety and isolation.
Ask the client to relax their forehead, brows and eyelids. Squinting, raised brows or a heavily tilted chin changes the apparent eye shape and lash projection. For open-eye views, give them a specific point to look at; for closed-eye views, ask them to rest the lids without squeezing. Wait for occasional watering to settle before comparing colour and symmetry.
Lighting for extensions and lash lifts: soft, directed and repeatable
 Open the full-size image (new tab)
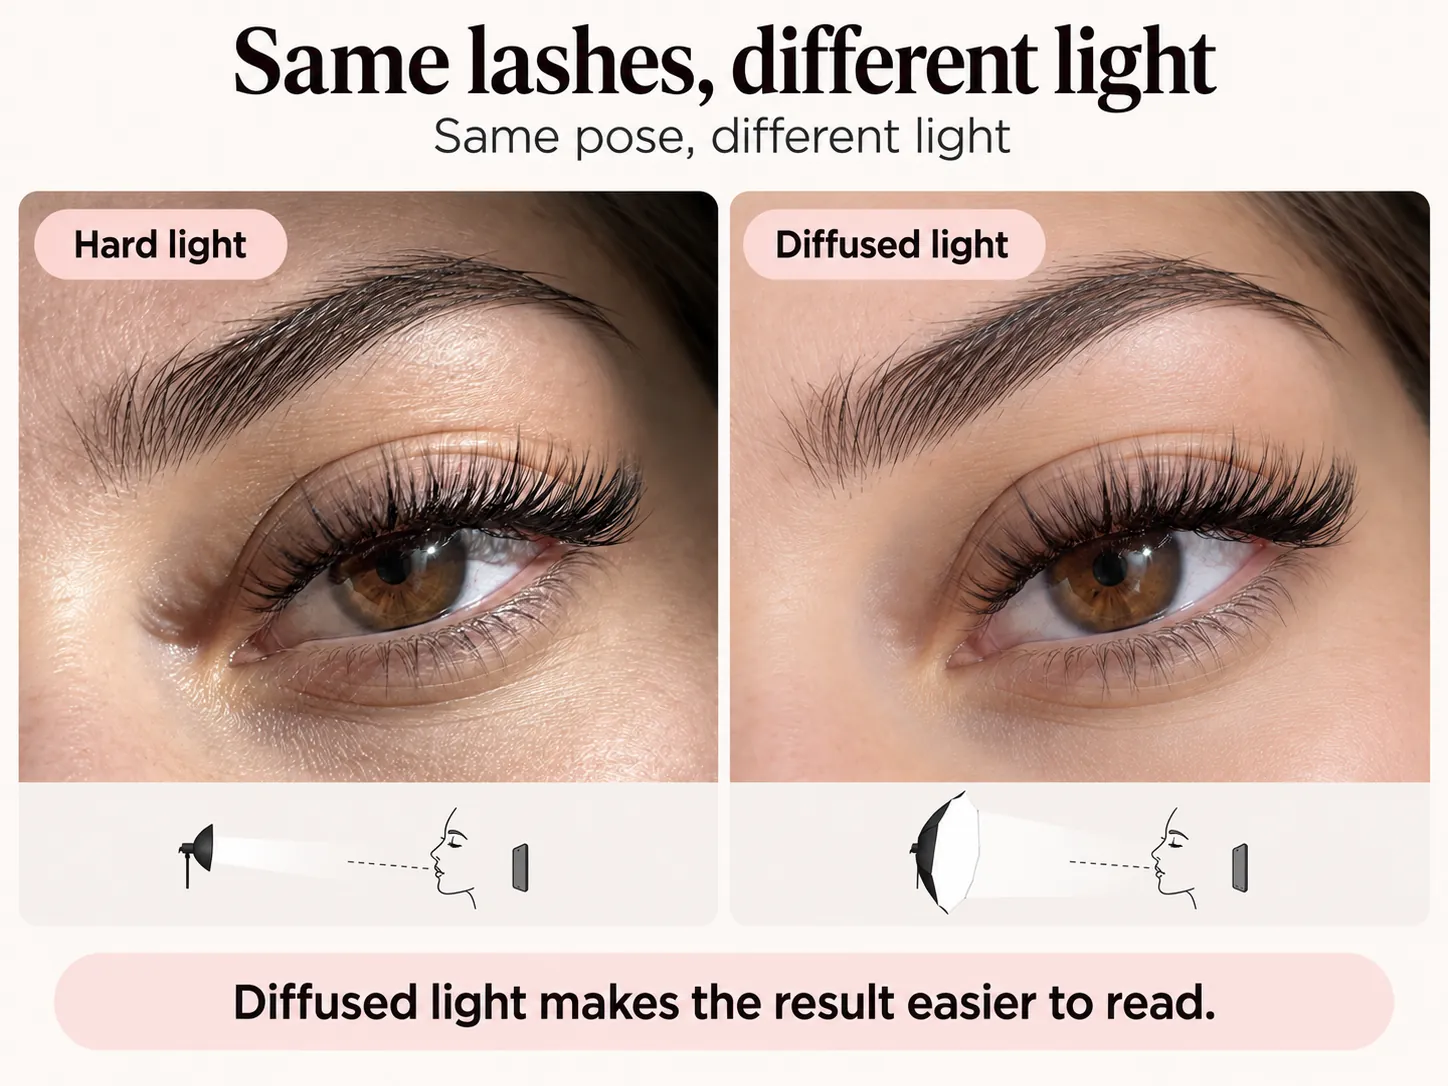
Light should separate dark fibres without erasing skin texture or creating shadows that look like gaps. Start with a broad, diffused source slightly above and to one side of the camera. A matte white reflector can soften the opposite side. The larger the source appears relative to the subject, the softer the transition; a small, distant source creates sharp shadows and harsh reflections.
A ring light can be practical, but it is not automatically the best option. Near the camera axis it produces even light and a circular reflection; from the side it may create double lines or darker areas. A diffused panel or softbox makes it easier to move reflections while preserving shape. Judge the effect on lashes and skin, not the lamp’s product name.
Avoid mixing cool window light, a warm lamp and ceiling lighting. White balance can correct an overall cast, not two halves of a face lit in different colours. With natural light, switch off incompatible sources and work while conditions are stable. With artificial light, reduce competing window light and record position, distance and intensity so you can repeat them.
Check | What to look for | Adjustment |
|---|---|---|
Direction | Shadows from the nose, eyelid and lashes | Raise and reposition the source, then check both eyes again |
Diffusion | Bright spots and tonal transitions on the skin | Use a broader source or add suitable, safe diffusion |
Evenness | One eye appears lighter without a technical reason | Centre the setup or use a controlled reflector |
Colour | Skin looks green, orange or different on each side | Remove mixed lighting and photograph the neutral reference again |
Smartphone tutorial: iPhone 15 focus and exposure
Prepare a repeatable test with Apple’s Camera app in Photo mode, using the rear camera at 1×. To check your system version, open Settings → General → About; if it differs from the iOS 18 reference, check the arrangement of the controls.
Clean the lens, stabilise the phone and turn off flash and filters. If moving closer makes the phone lose focus, step back and check the photograph. Record the camera, distance and pose. Avoid changing magnification between before and after.
Control diagrams, not original screenshots. Reference: iPhone 15, Apple Camera app, iOS 18 user guide. The manual version does not confirm which version is installed on your phone.
If you change distance, pose or framing, tap the screen to unlock and refocus. AE/AF lock should not be treated as a white-balance lock.
Source: Apple iOS 18 user guide, focus and exposureThe tutorial uses the touchscreen controls described in the Apple iOS 18 user guide. iPhone 15 does not have the Camera Control hardware button. Its 2× option uses the quad-pixel sensor, rather than a separate telephoto lens. Stay at 1× for the test series; if you try 2×, record it and compare the files. See the iPhone 15 technical specifications.
Focus on the lash plane, not simply the face
 Open the full-size image (new tab)
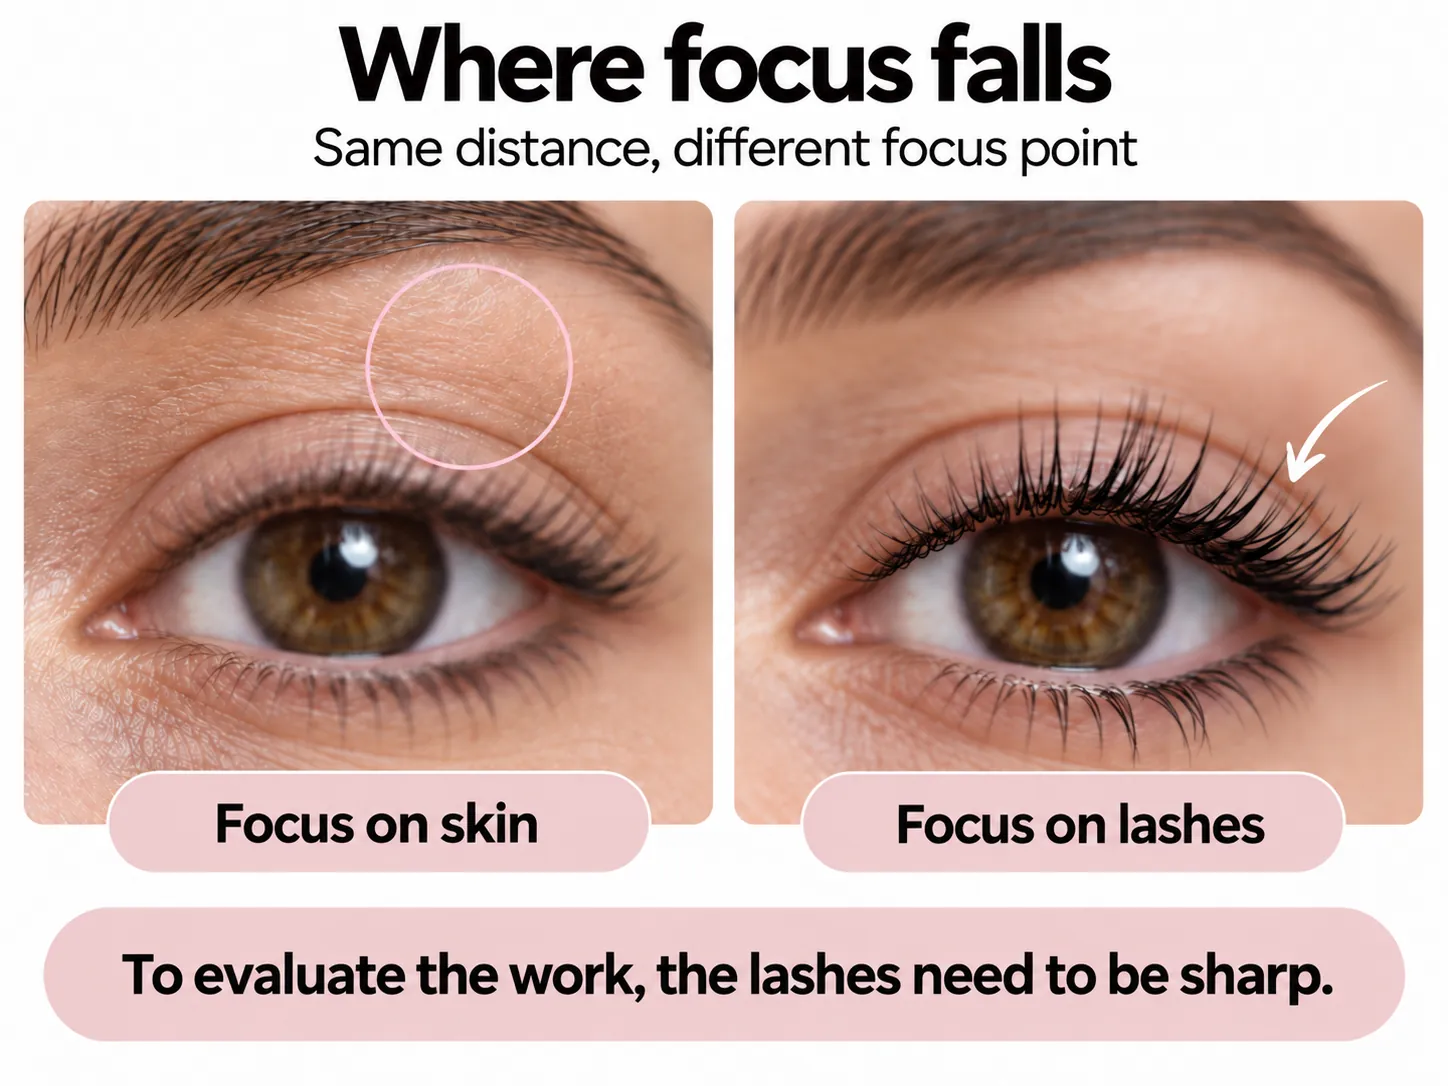
In the comparison, sharp skin can be misleading: the lashes need to be readable in the file. Check the centre, inner and outer corners, and tips. If your distance from the client changes, refocus before continuing.
An excessively shallow depth of field can leave three fibres sharp and everything else blurred. Increase the distance, use more light, keep the sensor as parallel as possible to the plane you want to document and do not always seek the widest aperture. In a three-quarter view, accept that the two eyes are on different planes and also take a more documentary frontal view.
Software sharpening cannot recover detail that was never recorded. Super-resolution or generative fill can invent separation and fibres and must not be used as evidence of a treatment. A smaller, lightly optimised web copy is acceptable; the technical original should remain available and clearly distinguishable.
Exposure: readable lashes without clipped skin
Check that the eyelid and fibres retain detail. If the skin becomes solid white, reduce exposure; if lashes merge into a dark mass, adjust the light’s direction and diffusion first. Black should not turn grey simply to separate the fibres.
For before-and-after photographs, recreate the conditions of the first series. Do not assume the lock has stayed active throughout the treatment: check focus and exposure again. Use the record sheet to note the conditions to repeat.
Framing: a complete series for extensions and lash lifts
 Open the full-size image (new tab)
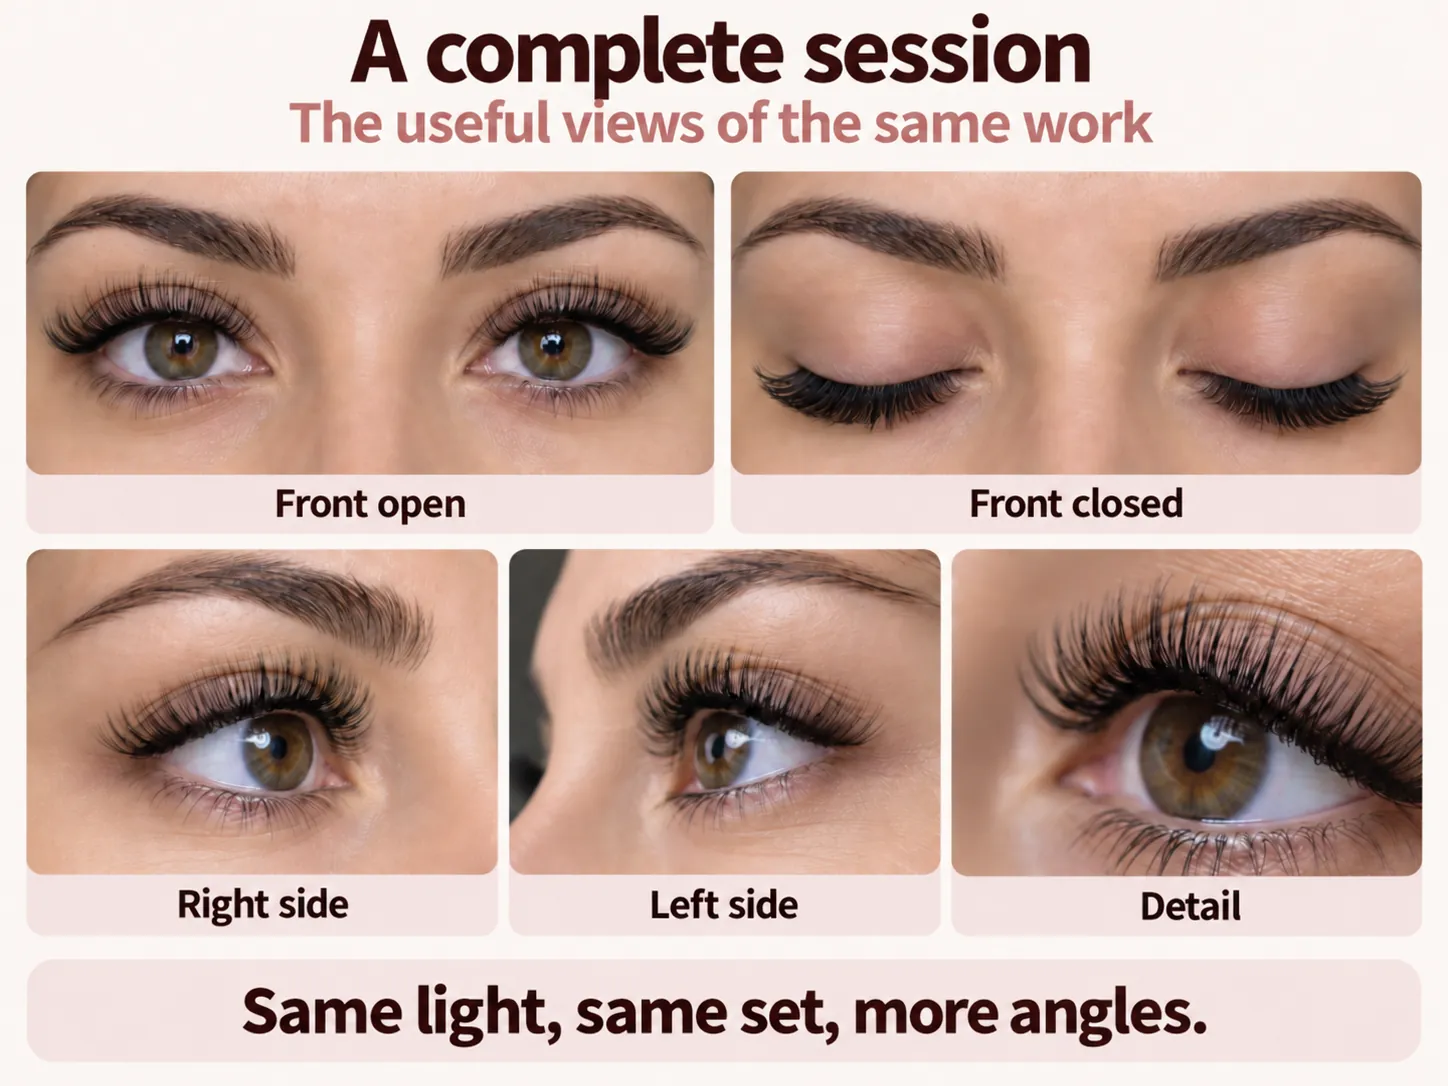
The first view should show the effect on the face: camera at eye level, head straight, a defined gaze and both eyes visible. It helps assess apparent symmetry, openness and consistency with the plan, rather than measure individual distances. The guide to curls, lengths, diameters and weight explains technical decisions that photographs can document but cannot validate on their own.
The eyes-closed view shows distribution, transitions, the upper line and symmetry without changes in gaze. Photograph perpendicular to the face and then from a gentle three-quarter angle, keeping the light the same. Avoid tilting the head far back to make the lash line look fuller: it changes projection and weakens the comparison.
Side views show curl, direction and transitions between zones. Photograph right and left from the same height and distance. A macro view can show fans and alignment, but it should not be the only image of a classic one-to-one or volume, hybrid or mega-volume set. One perfect area does not automatically represent the whole set.
For an infill, add a series before cleansing and application where relevant and authorised, showing outgrowth, retained extensions and overall alignment. Repeat the series after the final check. The guide to extension retention and infills helps distinguish retention records from a promise that a set will look identical over time.
Standard shot list for an extension service
Before, frontal, eyes open: face aligned, agreed gaze, light and camera settings established.
Before, frontal, eyes closed: relaxed lids and both eyes at the same scale.
After, frontal, eyes open: overall effect, symmetry and relationship to the eye.
After, frontal, eyes closed: line, transitions, distribution and overall directions.
Right and left sides: curl, transitions between zones and comparison of the two sides.
Technical detail: check focus on roots and fans without replacing the complete views.
Final portrait: only after the neutral series, with any editorial pose clearly identified.
Lash lift views: curl, direction and colour
For a lash lift, the open-eye frontal view shows the perceived effect, but depends on gaze, eyelid and chin position. Add an eyes-closed view for direction and symmetry, and two profiles to see the curve from base to tips. Side lighting should describe the shape without turning a bend into a reflection or hiding crossed tips.
Do not brush lashes into a position they cannot hold or saturate them with a product outside the protocol. If the system includes a finishing treatment, record when the image was taken: immediate shine may differ from the appearance hours later. Do not present that surface difference as growth or increased thickness.
If tint was applied, include a neutral photograph and a colour reference at the start of the series. The guide to professional eyelash tinting covers selection and application separately: photography documents colour and does not justify changing timing or products to obtain a darker appearance on camera.
If a lash lift has bent tips, crossed directions or excessive curl, do not choose only the angle that hides them. Keep neutral documentation, stop further manipulation and consult the criteria in the guide to lash lifts that have gone wrong. Photography should support technical review, not resolve it visually.
Standard shot list for a lash lift
Before, open and closed: clean lashes, no lash curler and recorded conditions.
After, frontal, open: the same gaze as before and relaxed eyelids.
After, frontal, closed: alignment, separation, symmetry and tint colour.
Right and left profiles: curl from base to tips without changing the chin angle.
Tip detail: enough depth of field to reveal bends or crossed fibres.
Notes: system, tint, finishing treatment and time of capture where relevant.
Build an honest before-and-after comparison
 Open the full-size image (new tab)
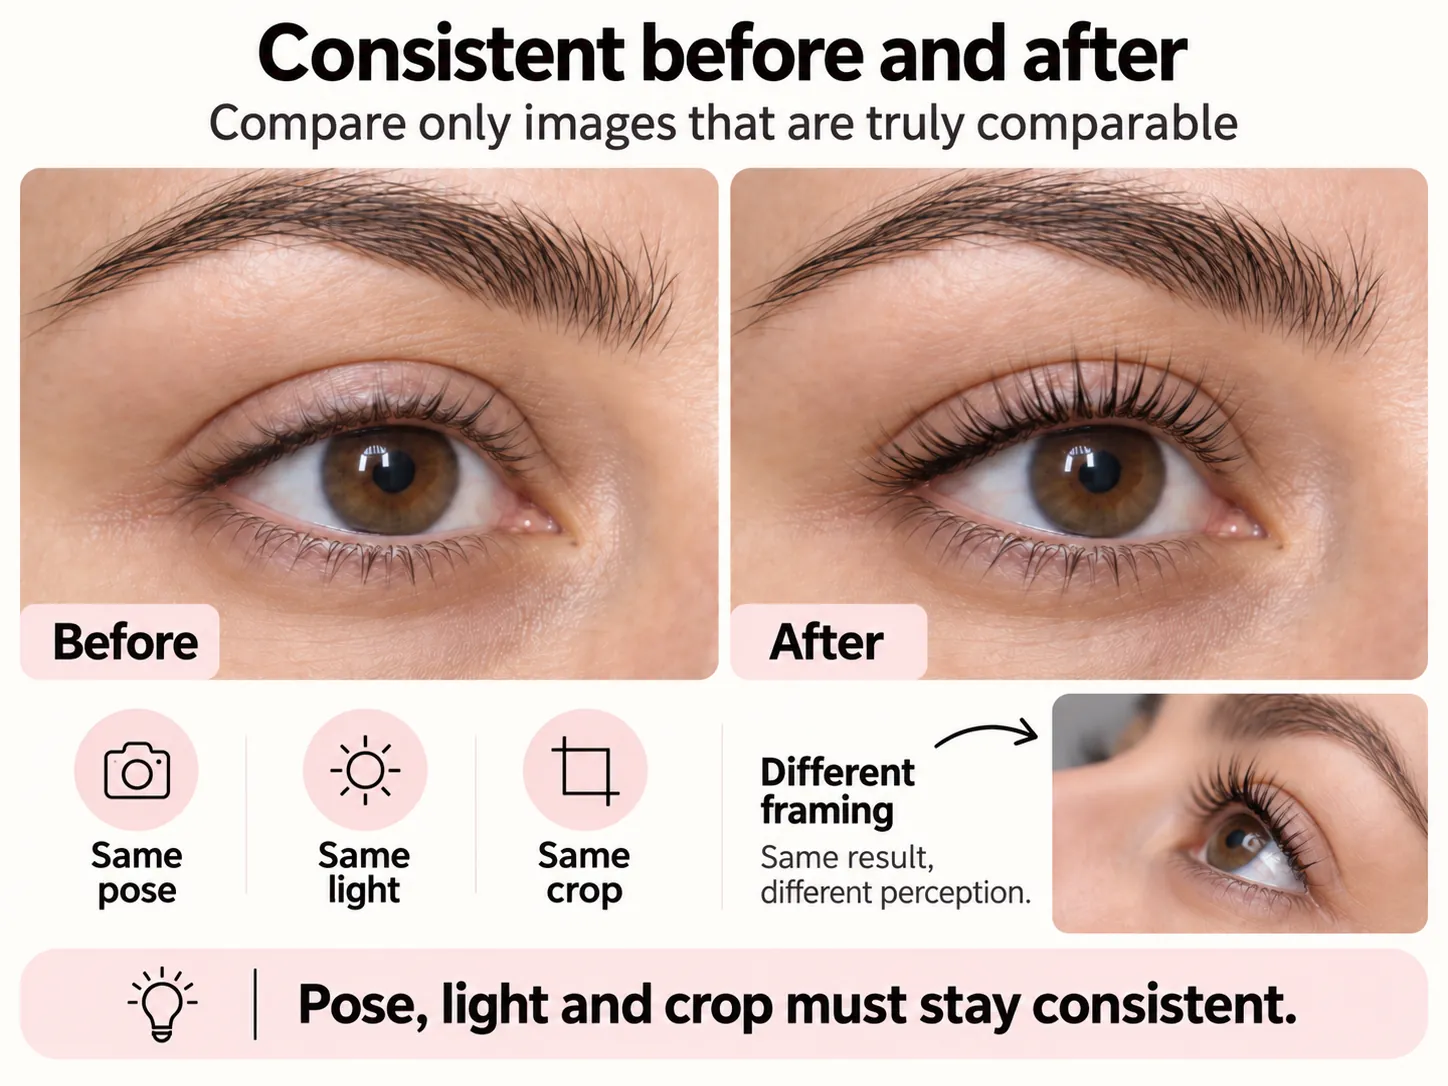
A fair before-and-after comparison changes one main variable: the treatment. Match device, camera, focal length, distance, height, orientation, light, exposure, white balance, background, client position, gaze, expression and crop. If a condition changes, disclose it instead of presenting the images as directly comparable.
Take the before images after photographic preparation but before treatment: no mascara, lash curler, eyeliner added to only one image or oily eyelids. Take the after images once the protocol is complete and the surrounding area is clean. Do not select a tired expression, flat light or unflattering distance for the before image to exaggerate the transformation.
Use a reference sequence: frontal open, frontal closed, right side, left side and detail. Mark the seat, tripod and light positions; record focal length and orientation. Name files with a code, date, phase and view. Repeatability makes the comparison useful for training and quality control as well as social media.
Do not combine before and after at different scales. Align the eyes and facial axis, then apply the same crop. Do not mirror just one image, replace the background in only one phase or apply a warmer or more contrasty filter to the result. Label collage phases clearly without implying that they were captured simultaneously.
In the Camera app, white balance still needs to be checked across the series: AE/AF locks focus and exposure and should not be treated as a white-balance lock. Keep the light source consistent and photograph a neutral reference under the same light.
Accurate colour: light, white balance, profile and screen
 Open the full-size image (new tab)
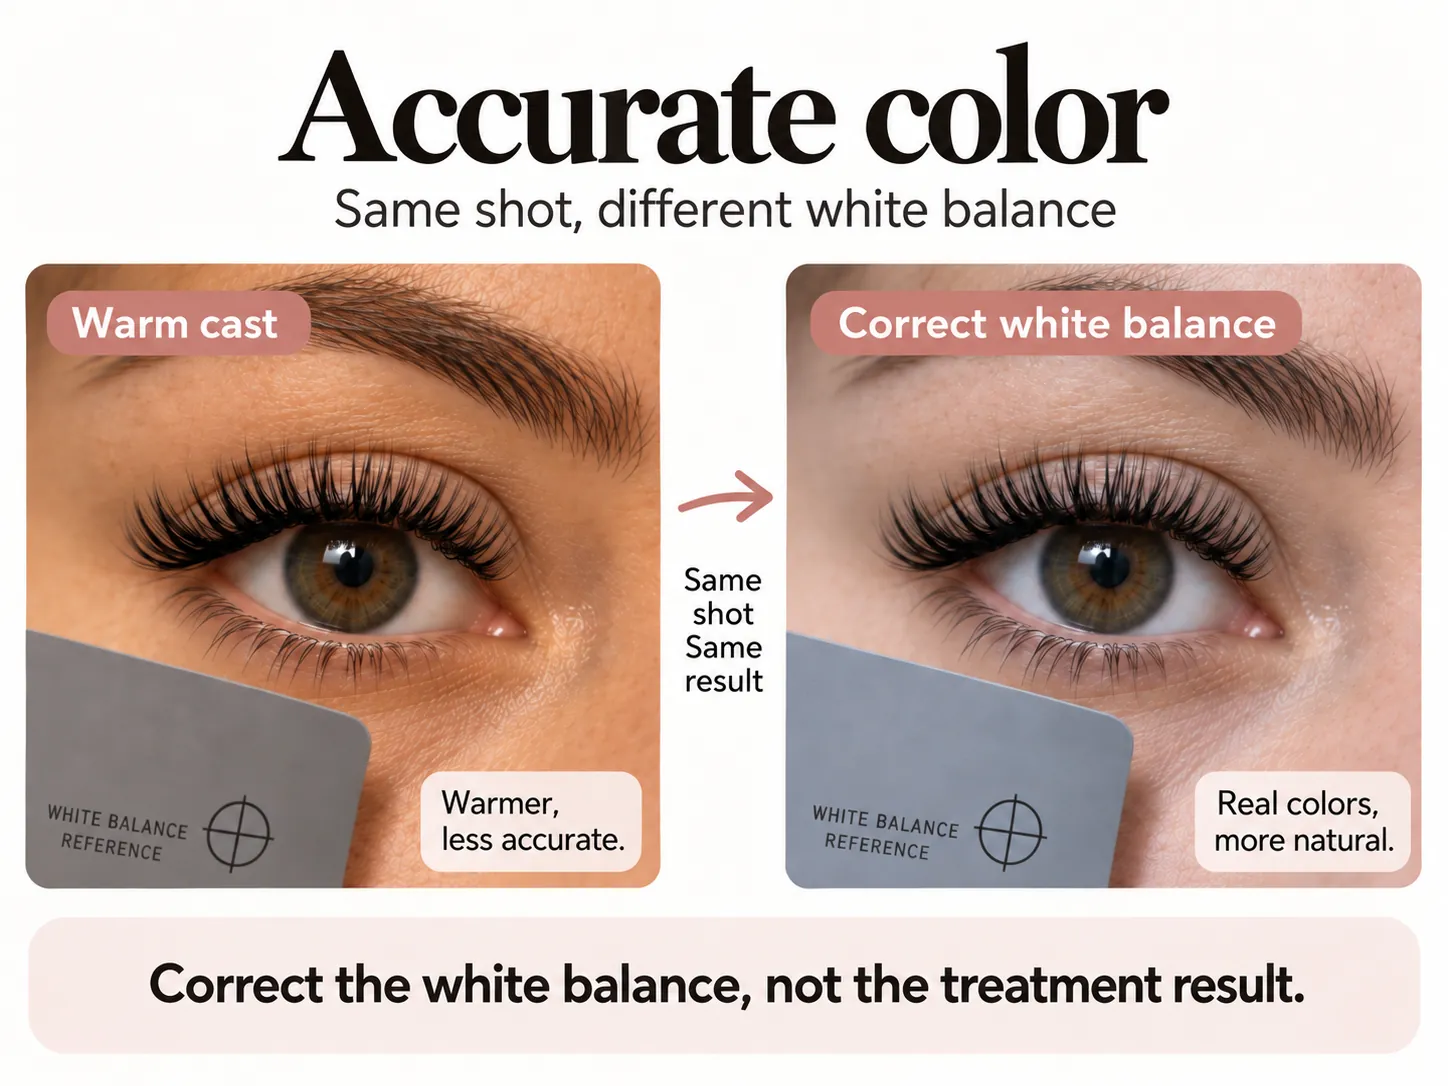
Colour accuracy is a chain. The source lights the skin and fibres; the sensor records them; white balance interprets the light; the profile converts colour; the display shows it; export delivers it to apps and browsers. No single Kelvin value guarantees fidelity. Start with one stable source and include a neutral grey card or suitable reference under the same light as the face at the beginning.
Adobe Camera Raw describes white balance using a neutral white or grey area and distinguishes RAW files from already processed JPEGs. Use the reference to adjust temperature and tint across the series, then check skin and a known colour. Do not neutralise a bright spot with no detail: a specular reflection is not a reliable sample.
A RAW file retains more flexibility for white balance, exposure and tones but needs consistent processing. A JPEG is more immediate but includes the device’s processing and compression. Choose a format you can manage, keep the original and do not treat greater flexibility as permission to intensify black, contrast or saturation beyond the real result.
For the web, export an sRGB copy with an embedded profile. The International Color Consortium lists sRGB as a space defined by IEC 61966-2-1 and publishes ICC profile specifications. This does not make every screen identical: brightness, gamut, vivid modes and ambient light still differ. It does reduce ambiguity compared with a file without a defined colour workflow.
Stage | Controllable decision | Common mistake |
|---|---|---|
Capture | One light, a neutral reference and stable settings | Different automatic settings for every view |
Processing | Global adjustments linked to the reference | Creative preset that changes blacks and skin tone |
Check | Reliable display and comparison with the result | Adjusting only on a phone in vivid mode |
Export | sRGB copy, suitable dimensions and a separate original | Screenshot or repeatedly re-saved JPEG |
The standard iPhone 15 Camera app records HEIF or JPEG; it does not offer Apple ProRAW. RAW here refers to devices or apps that support it. A consistent series is more useful to begin with than a format you cannot process confidently.
Ethical editing: what to correct and what to leave unchanged
Adjustments generally compatible with faithful documentation include cropping, straightening, moderate global exposure, white balance, careful highlight and shadow recovery, noise reduction and output sharpening. Apply the same adjustments to before-and-after images taken under identical conditions. Keep a non-destructive master and a separate original.
Do not add, duplicate, lengthen, thicken or realign lashes. Do not erase stickies, gaps, bent tips, residue or irritation to present technically different work. Do not reshape the eyelid, eye or brow or smooth away all skin texture. An algorithm that reconstructs edges can produce plausible fibres that never existed.
Removing background dust is not the same as removing a treatment defect. Before editing, ask whether the change affects the environment or the evidence of the service. If it changes what a client can expect from extensions or a lash lift, it is not a neutral photographic correction. Label creative or composite images and do not use them as before-and-after evidence.
Privacy and consent: capture, storage and publication
Consent to a treatment does not automatically authorise photographs for social media, websites or advertising. Distinguish private client records, internal teaching, public portfolios, organic social posts and paid promotion. Italy’s data protection authority explains that consent must be freely given, specific, informed and unambiguous; different purposes should not be compressed into one generic permission. Check the applicable requirements in your jurisdiction.
Explain which parts of the face will be visible, on which channels, for how long, who manages the files and how applicable rights can be exercised. Do not make an ordinary service conditional on agreeing to promotional use. Eyes, tattoos, jewellery, brows, surroundings, dates and appointment links can make even a tight crop identifiable.
Store originals in folders with restricted access, avoid full names in exports, remove unnecessary geolocation from public copies and define retention periods. If a client withdraws consent where the applicable basis allows it, you need to know where the image was used. Disorganised folders shared through personal accounts make these choices harder to respect.
For models, collaborations, courses or work by several professionals, clarify roles, credits, file delivery and permissions too. Do not publish images received in a chat assuming the sender holds every necessary right. Seek qualified privacy advice when the workflow, legal bases or intended uses become complex.
Photography record sheet, selection and export
Completed record sheet: an example
This is an example of how to complete the sheet, not a report of a session by the author. The distances show how to record a measurement: measure your own setup and check focus rather than assuming 35 cm works for every phone or view.
Field | Completed example |
|---|---|
Device, app and version | iPhone 15; Apple Camera; iOS 18 as the tutorial reference. |
Mode | Photo, rear camera at 1×; flash off; no filter. |
Light position | One diffused panel above and to the left of the phone; no differently coloured light source. |
Distances recorded in the example | 35 cm from the lens to the lash plane; 60 cm from the diffuser to the face. Measure your own distances: these numbers are not prescriptions. |
Focus and exposure | Focus on the lash line; AE/AF locked for the same view and reset after each change of pose. |
Views taken | Frontal open, frontal closed, right side, left side and detail. |
Adjustments applied | Consistent crop only; no changes to fibres, shape, density or tint. Originals retained. |
Final check | Tips and corners checked in the magnified file; blurred photographs to be retaken before dismantling the setup. |
Download the photography record sheet: example + blank fillable template (PDF, 2 pages)
Complete the second page in a PDF reader or print it. Record the actual device, app, version, light, distances, views and adjustments; use a session code. If a pose requires a different distance, record it for that view and repeat it for the comparison.
Import originals before editing. Delete only technically unusable shots after checking that every required view exists. Create a master folder, a technical selection and a publishable selection. Keep the permission record linked without putting sensitive details in the filename. A useful pattern is code-date-service-phase-view-version.
Select for sharpness, consistency and information first; visual impact comes later. Do not choose the most dramatic image if it is also the least representative. Check edges, both eyes, reflections, colour cast and crop on a sufficiently reliable monitor. Compare the file with the result and, where possible, a reference photographed in the same light.
For the web, create a copy sized for its container and compressed without destroying lash detail. Keep the sRGB profile, a descriptive filename and alt text explaining what the image shows, rather than a keyword list. Do not overwrite the high-quality original with a social export. Avoid screenshots, repeated transfers through apps that recompress files and repeated saves of the same JPEG.
The guide to the professional lash artist kit distinguishes essentials from purchases that can wait. Start with a clean lens, stable support, one diffused source, matte reflector, neutral reference and shot list; buy lenses and accessories only when you know the specific limitation they need to solve.
Common photography mistakes with extensions and lash lifts
Problem | Likely cause | Action |
|---|---|---|
Black lashes with no separation | Deep shadow, low exposure or flat frontal light | Move and diffuse the light before brightening the file |
One eye looks larger | Wide lens too close, turned face or off-centre camera | Step back, centre the camera and repeat height and focal length |
Before and after look very different | Changes in pose, light, scale, make-up or automatic exposure | Keep variables stable and mark positions |
Blurred tips | Focus on the skin or insufficient depth of field | Tap the lash plane, stabilise and realign |
Tint looks too warm or cool | Mixed lighting or variable automatic white balance | One source, neutral reference and consistent series adjustments |
Missing edges | Portrait mode or automatic background removal | Turn off the effect and use real distance from the background |
Four practice sessions to make the method repeatable
Light: photograph the same mannequin with frontal, side and diffused light; compare shadows and reflections.
Focus: try three distances, inspect the magnified files and record where lashes remain sharp.
Before/after: repeat five views without a treatment between series; identify differences caused by the setup.
Colour: photograph a neutral reference under one source and check the exported copy.
Photography improves when you know what it needs to show. In BeautyLearn lash courses, technique, assessment and control build the result you later document. Do not use a sophisticated photographic setup to compensate for unreliable attachments, directions or procedures: develop your technical judgement first, then standardise capture.
Frequently asked questions about extension and lash lift photography
Is a smartphone enough, or do I need a professional camera?
You can start with a smartphone: stabilise the light, device and pose first. Changing cameras makes sense when you know which limitation you need to solve. The tutorial uses iPhone 15; other phones may have different controls and capabilities. Go to the practical step.
Ring light, softbox and Kelvin: how do I choose the light?
Compare fibre visibility, shadows and comfort as in the lighting example. Kelvin alone does not describe source quality or guarantee colour accuracy. Avoid mixed lighting and record the setup that works. Go to the practical step.
I locked focus, but the tips are still blurred: what should I check?
The lock does not correct camera shake or make different planes sharp. Inspect the captured file, steady the phone and refocus if you change distance. Add a frontal view to a three-quarter shot: the two eyes are on different planes. Go to the practical step.
Can I use 2× on iPhone 15?
Yes: iPhone 15’s 2× option uses the central area of its quad-pixel sensor, not a separate telephoto camera. The tutorial starts at 1× for a repeatable test. If you choose 2×, record it, check the file and keep it the same in both phases of the comparison. Go to the practical step.
Are Macro and Portrait modes suitable for technical photographs?
They are not needed for the basic series. The standard iPhone 15 does not offer the macro mode available on compatible Pro models. Portrait effects can alter fine edges: use Photo mode to document lashes and check any copy with added blur. Go to the practical step.
How many views do I need, and when should I photograph a lash lift?
The proposed series has five views: two frontal, two side and one detail. Photograph a lash lift after the complete protocol and record any specified finishing treatment. The two shot lists explain what to look for in each view. Go to the practical step.
Can I edit out a gap, change a lash or alter the tint?
No, if the photograph represents the service result. Distinguish global photographic adjustments from changes to the lashes. An AI tool that invents fibres or separation also changes the evidence: always keep the original. Go to the practical step.
Why does colour change after export or on social media?
Displays, processing and compression can change appearance. Follow a consistent colour workflow, avoid platform filters and check the published copy. The colour section explains the neutral reference; AE/AF lock does not replace that check. Go to the practical step.
Does an eye crop remove the need to check publication permissions?
No: even a detail can identify someone. Consent to the service does not automatically authorise promotional use. Before publishing, check the purposes, channels and image handling described in the privacy section. Go to the practical step.
Technical sources and editorial method
For the tutorial controls: Apple iOS 18 user guide on adjusting and locking focus and exposure; for the model’s cameras and formats: Apple iPhone 15 technical specifications. The diagrams simplify the interface described in the manual.
For white balance, clipping and processing, the reference is Adobe Camera Raw documentation on colour and tonal adjustments, which explains neutral areas, temperature, tint and histograms. For colour on the web, see the International Color Consortium sRGB registry.
For image publication, the reference is Italy’s data protection authority, which explains freely given, specific, informed, unambiguous and granular consent for distinct operations and purposes. This source concerns its own jurisdiction. Application, legal basis, retention and consent forms require assessment of the specific situation and local requirements.
Explore all BeautyLearn lash guides and lash courses. Update the record sheet whenever you change phone, app, lighting or publishing channel.
For fragile or thinning lashes, see cosmetic care, serums and when to seek medical advice.
Adjust your workstation with the guide to lash artist posture and ergonomics.
Connect your photographs with enquiries through the guide from portfolio to booking.